Simple GAS tutorial
Epic Games, unlike most of its competitors in the “freely-available game engine” market, actually makes video games. This gives Unreal Engine some unique advantages that most other competing engines simply don’t have, due to a lack of interest, experience, and/or resourcing from their makers. As an Unreal developer, you get direct access to some of Epic’s in-house tools that ship with the engine and are used directly in such AAA blockbusters as Fortnite (and some canceled titles, like Paragon).
One of these is the Gameplay Ability System, which can be considered to be the vastly superior replacement for the obsolete actor damage system still in the engine from Unreal Tournament.
GAS is a very powerful and generic system that deals with many “game” concepts for you, such as abilities (the game logic of how a fireball works and looks), attributes (HP, MP, Agi), damage types, status effects, cooldowns, DoTs, and so on, in a designer-friendly and data-driven manner, with plenty of BP support. It also comes with built-in support for predictive multiplayer, and is more or less a no-brainer to use in a “traditional” Unreal multiplayer setup.
The ability system is flexible enough that you can have a very broad interpretation of what an “ability” is and even reuse it for other tangential tasks to benefit from the features and architecture that it provides. Interaction can be an ability, jumping can be an ability that levels up with better shoes instead of directly calling ACharacter::Jump, attacking can be an ability that holding a weapon grants while it’s held, and I’m sure some games define even more mundane things as abilities.
All of this above often misleads people into thinking that GAS is a complicated system that’s “not worth it” for simpler games that don’t need this functionality. Part of the flexibility that GAS offers is that you can pick just the things that you like and leave the rest dormant. If you find out later that you do need something extra, it will be right there, ready to go. As an example, ability prediction keys can be useful even in single player to identify individual ability activations (this fireball vs. that fireball and their related objects, like the VFX) and you get them automatically.
The basic setup to get going with GAS is fairly simple, and will be demonstrated below.
If you don’t have significant experience with the Unreal framework, it can be beneficial to use GAS anyway just to get some architectual guidance from the engine on how you’re expected to do these things.
This article will take the default third-person C++ template and extend it with GAS to:
- Use the ability system for characters.
- Define one attribute (HP).
- Implement one damaging ability.
It will NOT be multiplayer-ready or demonstrate overall best practices. There are plenty of resources for those (from the community and Epic both), the target audience of this article are people who are wary of using GAS at all.
Sometimes, additional information and background will be provided in fine print that you can completely ignore if it doesn’t immediately make sense.
The basic setup shown here is fairly easy to refactor (you might want to have a shared base class with the ASC on it instead of what we’ll do here) and will scale well into single player games of various complexities.
Unlike the rest of this blog, I’m licensing all code found in this article under the WTFPL 2, so feel free to copy what you need.
This tutorial was written against Unreal Engine 5.3.2. It will not work on 5.2 or earlier.
The only notable change between 5.3.2 and 5.5 is the deprecation of non-instanced gameplay abilities. Good riddance.
Project setup
Create a Third Person C++ project. Even if you’re targeting a different genre, please use third person to follow along. There are issues with the code of some of the other templates that third person does not have. C++ is strictly required to set up GAS, but it can be added into any existing project easily as you will see throughout this article.
Set Target Platform to Desktop, Quality Preset to Scalable, disable
Starter Content and Raytracing, and call the project MiniGAS.
In Unreal, select Edit->Plugins, and turn on the Gameplay Abilities plugin.
Doing so, it will ask you to restart, but instead, quit Unreal completely and
leave your IDE up and running.
Open MiniGAS.Build.cs and add "GameplayAbilities" to
PublicDependencyModuleNames.
Ability System
Open MiniGASCharacter.h, add #include "AbilitySystemInterface.h", and make
AMiniGASCharacter implement IAbilitySystemInterface:
class AMiniGASCharacter : public ACharacter, public IAbilitySystemInterface
Add this to the body of the character class, somewhere in the public section:
UPROPERTY(VisibleAnywhere, BlueprintReadOnly)
UAbilitySystemComponent* AbilitySystem;

virtual UAbilitySystemComponent* GetAbilitySystemComponent() const override
{
    return AbilitySystem;
}
In MiniGASCharacter.cpp, add #include "AbilitySystemComponent.h" near the top
and this line to the end of AMiniGASCharacter’s constructor:
AbilitySystem = CreateDefaultSubobject<UAbilitySystemComponent>("AbilitySystem");
To complete the component’s setup, add this to the end of BeginPlay:
AbilitySystem->InitAbilityActorInfo(this, this);
That’s it, you have GAS set up and ready to go! It wasn’t that scary, now was it?
You don’t need to create the ASC right away. Fortnite trees for instance lazily create them when they’re first damaged. InitAbilityActorInfo takes two actor parameters, because you can, e.g., keep your player’s ASC on its player state instead of the pawn directly. The first parameter is the actor that owns the ASC, the second is the one that represents it in the game world.
Attribute Set
Create a new file called MiniGASAttributeSet.h in Source/MiniGAS and add this:
#pragma once

#include "AbilitySystemComponent.h"
#include "AttributeSet.h"
#include "MiniGASAttributeSet.generated.h"
A comment in the engine’s AttributeSet.h file suggests to combine its attribute helper macros into one, so let’s do it right away. Keep adding to the file:
#define MINIGAS_ATTRIBUTE_ACCESSORS(ClassName, PropertyName) \
        GAMEPLAYATTRIBUTE_PROPERTY_GETTER(ClassName, PropertyName) \
        GAMEPLAYATTRIBUTE_VALUE_GETTER(PropertyName) \
        GAMEPLAYATTRIBUTE_VALUE_SETTER(PropertyName) \
        GAMEPLAYATTRIBUTE_VALUE_INITTER(PropertyName)
Write the UCLASS that contains the HP attribute:
UCLASS()
class UMiniGASAttributeSet : public UAttributeSet
{
    GENERATED_BODY()

public:
    UPROPERTY()
    FGameplayAttributeData HP;
    MINIGAS_ATTRIBUTE_ACCESSORS(UMiniGASAttributeSet, HP);
};
Using the attribute set
To add the attribute set to the character, you need but to create it.
In MiniGASCharacter.h, add this property to the character class, somewhere
public:
UPROPERTY()
class UMiniGASAttributeSet* AttributeSet;
In MiniGASCharacter.cpp, add #include "MiniGASAttributeSet.h" near the top and
this to the end of the constructor:
AttributeSet = CreateDefaultSubobject<UMiniGASAttributeSet>("AttributeSet");
That’s it, the character has HP now. GAS automatically detects and uses attribute sets that are created this way.
If you need to dynamically create attribute sets after construction for whatever
reason, you can do that with NewObject<T>() and
AbilitySystem->AddSpawnedAttribute().
Like their name suggests, attribute sets hold a set of attributes. To have more than one attribute, keep adding properties and accessors to the attribute set class. It’s fine to use one global attribute set for everything, but you can have more granular sets and mix and match per actor as it suits your game.
Another thing to note is that all gameplay attributes are floats. Chances are you had ints in mind for some of your attributes, so this can be surprising. Remember that you can be precise with floats: binary fractions such as 1.25 HP, whole numbers up to 16777216, etc. can be represented exactly and compared with ==, so this is not that big of a deal as it might look at first.
Making HP meaningful
As it stands, the HP attribute is completely meaningless: the character will start at 0 HP and damaging it will just make its HP negative.
Add this hack to the end of AMiniGASCharacter::BeginPlay():
AttributeSet->SetHP(3);

auto Attribute = AttributeSet->GetHPAttribute();
auto& Delegate = AbilitySystem->GetGameplayAttributeValueChangeDelegate(Attribute);
Delegate.AddWeakLambda(this, [this](auto)
{
    if (AttributeSet->GetHP() <= 0)
        Destroy();
});
Obviously, this is not good practice. At the very least, the initial value should be exposed as a UPROPERTY, but another way of setting initial values is to self-apply instant gameplay effects. This way, C++ doesn’t even have to know what attributes it’s defaulting, it can even be in another attribute set on a derived class. The delegate should also be connected to a proper method.
There are many other ways of reacting to attribute changes.
It’s not a bad idea to subclass the GAS classes such as UAbilitySystemComponent
and use them throughout your project to provide your own additional baseline
functionality, especially for BP.
There are tons of virtuals to override: for instance, UAttributeSet comes with
various Pre- and Post- hooks that can be used to enforce various game rules,
like HP never going above MaxHP.
Gameplay Effect
That is the C++ part done! Everything from here on out can be done through BP, and that’s exactly what we’ll do. Build the project and launch the Unreal editor.
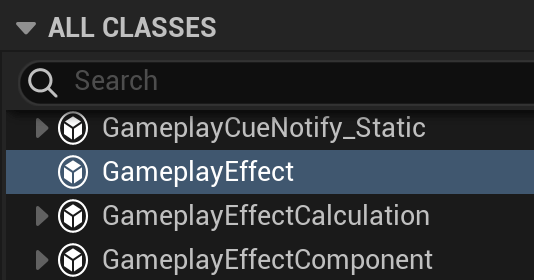
Create a new BP with a parent of GameplayEffect and call it GE_Damage.
You will need to use the “ALL CLASSES” section of the dialog:
Gameplay Effects are data only, so ignore the node graph in the BP editor. If it appears at all, save the BP, close it, and open it up again to get the data-only editor with just the details panel.
Add a modifier and set it up like so:
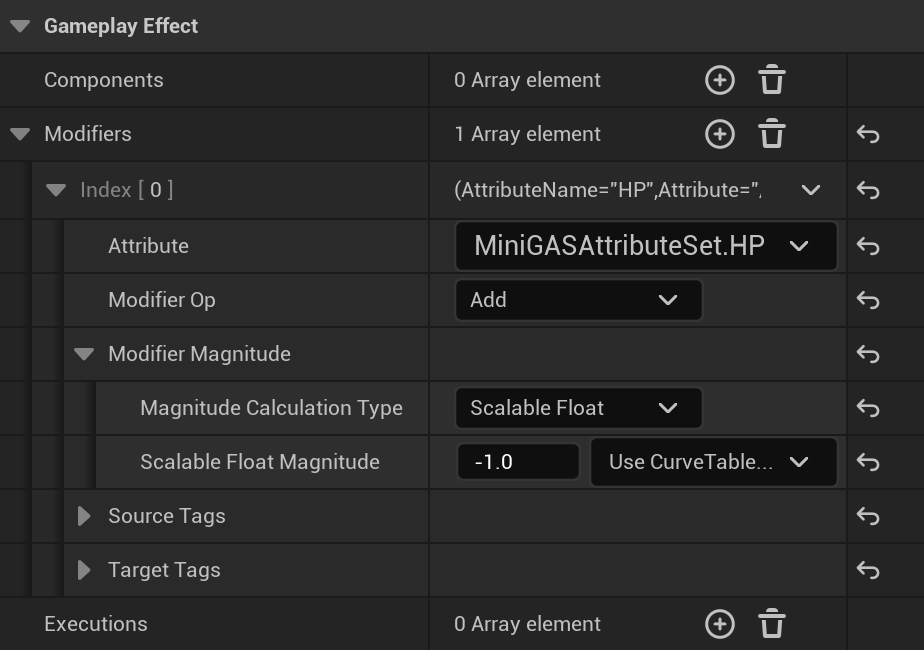
In English, this gameplay effect modifies HP by adding -1 to it, i.e., causing 1 damage.
There are lots of options here that this article won’t cover. The most notable one is Gameplay Cues, that let you define how this effect should look when applied: playing a sound, showing VFX for the hit, etc.
You can also define how the effect scales across your level ups, add custom calculations for crits, make effects with a duration (e.g., DoTs)… If it’s something commonly done by games, GAS probably supports it already.
Gameplay Ability
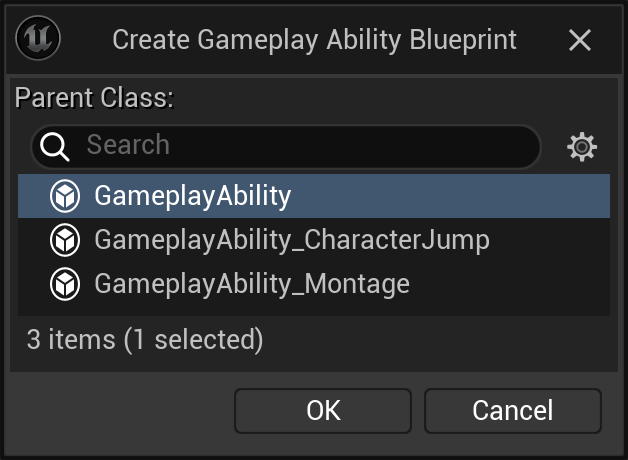
In BP, gameplay abilities are special and should be created as a “Gameplay Ability Blueprint” directly. You’ll find this in the Blueprint menu if you right-click an empty space in the Content Browser.
You’ll find that the engine has already defined a few for jumping or executing
a montage, but let’s use the core parent class called GameplayAbility for now.
Create the Gameplay Ability BP with that parent and name it GA_Damage:
The BP helpfully provides Event ActivateAbility already, so let’s implement it:
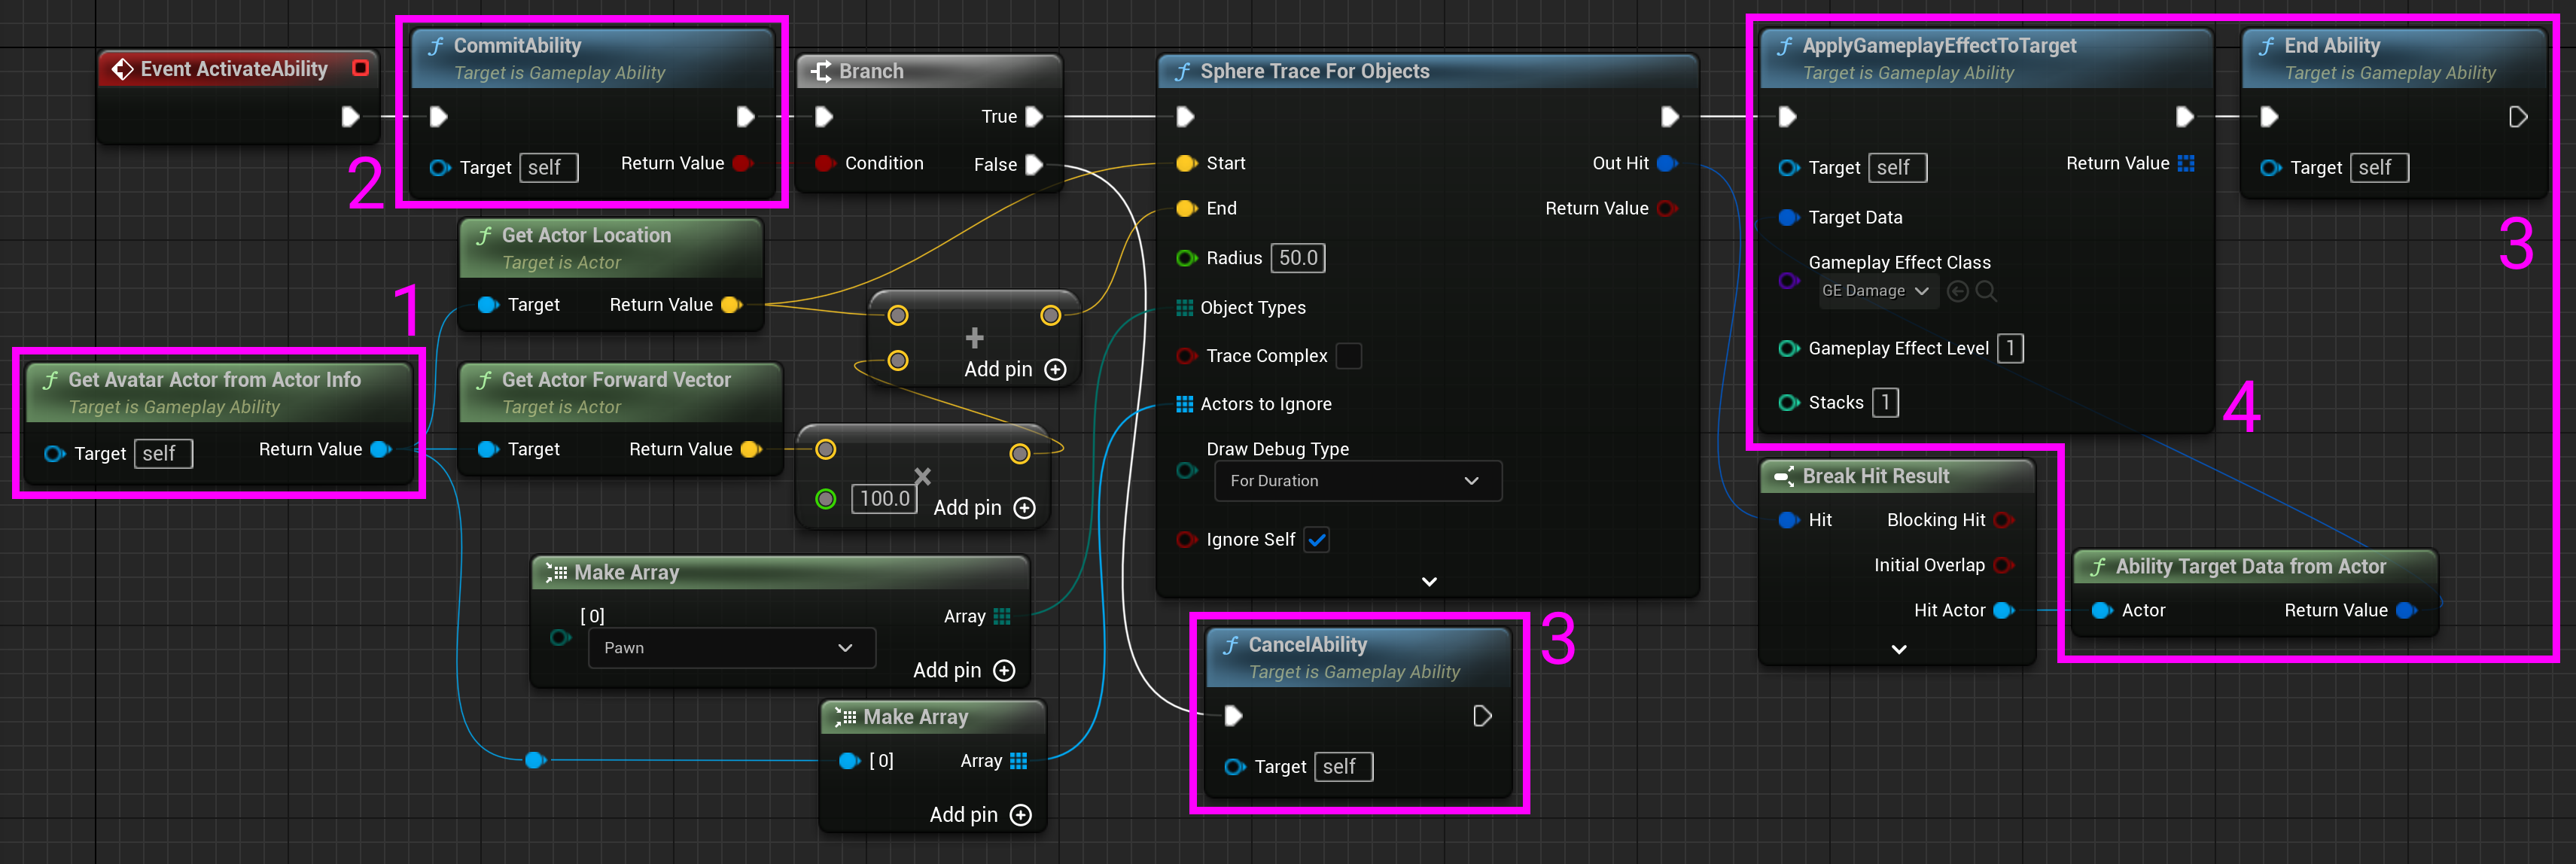
About half of this graph sets up a sphere trace and is exactly the same as a non-GAS BP would be. The GAS parts are highlighted.
- The getter node gets you the actor that’s using this ability. No surprises there.
- At the start, the ability has a chance to refuse to execute. If it wants to proceed, it must commit to it first.
- Gameplay abilities are asynchronous/latent in nature. BP doesn’t have a direct way of expressing “I’m done”, so one of the ending nodes such as CancelAbility/EndAbility must be called to end the ability on all execution paths.
- Apply Gameplay Effect is straightforward in this case, it targets a single
actor directly and applies 1 stack of
GE_Damageat level 1, removing 1 HP.
Commitment lets you implement some useful checks, such as “am I already casting a fireball?” and reject extra ability activations that you don’t want. This feature is not used in this tutorial, but a cost can be declared, and GAS can check for it in advance. Committing to an ability deducts these costs from its owner.
It’s really important to make sure all execution paths end the ability. You might want to explicitly show that any untaken branches or other disconnected exec pins are deliberate. In C++20, RAII-style helpers can be used with coroutines to make sure you can’t possibly forget to call these.
Target data can be more than just “that actor”, such as every enemy affected by an AoE spell. These can also be processed by other functions, e.g., removing friendly fire.
Using gameplay abilities
We’ll also need a way to activate this ability.
Add this to BP_ThirdPersonCharacter that was created with the project:

Ability levels are something that, e.g., MOBA-style games naturally have (heal, heal 2, heal 3, …). Input ID can be completely ignored.
In a real project, you’ll probably want a way to pre-grant a list of abilities.
A TArray<TSubclassOf<UGameplayAbility>> UPROPERTY can do the trick.
Some abilities are granted by events that happen in the game itself, this can be
done directly with “give ability” methods, or through a Gameplay Effect granting
an ability while it’s active.
And with this, the tutorial is complete!
Drag a few additional BP_ThirdPersonCharacters into the level, walk up to
them, and press 🅿️ three times to destroy one.